Sunday, February 28, 2010

Jumping Through Hoops


So tonight are the Closing Ceremonies, and lots of people have requested that I do Olympics nails over the course of the past few weeks, and wellllll, tonight is my last chance!! Pardon the shakiness, I just got home, I went to class from 8-1, hockey game from 130-5?, and drinking from 5-7 or so with some buddies from work. Good times. Note to self: NEVER drink Newcastle after SUPER-hoppy IPA, will taste horrible and like nasty caramel. Anyway, on to the nails.


I used Sally Hansen All the White Stuff, China Glaze Salsa for the red, Pure Ice French Kiss for the blue (and mixed with Sally Hansen All the White Stuff for the midsection of the logo body), Zoya Raven for the black, Diamond Cosmetics #319 Lemon Yellow Zest for the yellow, and Nubar Forest for the green. Topped everything off with 2 coats of Seche Vite top coat.

Congrats to all the countries on a job well done at the Olympics!! :)

Pages

If you were wondering what the little things at the top (Home, About me, etc.) they are called 'pages'. If you click on one it will take you to where it says its going. For instance, if it says "I'd love to see your nail designs!" then when you click on it, it will take you to my e-mail and you can send in designs you have done or want me to do. I added them a while ago and thought I would explain the feature, if you didn't know :) I also have them on my other blogs.

Abby

Saturday, February 27, 2010

It Ain't Easy Being Cheesy


Today's nails were inspired by something... and I'll give you a hint... They're little, and cheesy, and sometimes I have them for breakfast with my Dr. Pepper.... If you guessed Cheetos- YOU'RE RIGHT!! :-D I mixed both the mascot - Chester the cheetah's spots, with the orange funk that always covers your finger tips after a few of the electric orange morsels of deliciousness.


I used Sally Hanson Hard As Nails Xtreme Wear in 06 Sun Kissed as a base, with Zoya Raven applied with Konad Plate m57. For the orange Cheetos film on the tips, I sponged Electric Orange over the Konad pattern, and then sponged Essie Matte About You over top of it. For the shiny portion of the nail, I used Seche Vite top coat.

Dangerously cheesy.

Friday, February 26, 2010

That's Gonna Cause a Gummyache.


Ok, so today's nails are an homage to Fish. Not the cold, scaly, stinky kind, but the dude I work with, whose nickname is Fish. The plan today was to test his theory that he could eat a 5 lb gummy bear in one sitting. Unfortunately though, the company we work at caught wind and said 'No way Jose, not on OUR property!' So we went to Buffalo Wild Wings for lunch and he attempted the gastronomical feat there. The goal? See how much he could eat of it in a mere hour. Let me say, we were ALL impressed. He ate over 3 POUNDS of gummy bear in 1 hour. PLUS- the only reason he stopped is because we had to go back to work, he came back from lunch and promptly ate a sandwich. Seriously. In honor of what was to originally take place today, I painted gummy bears on my nails- even the best flavor - clear (pineapple) on the pinky nail, even though it is hard to make out what it is. :-P OVER 3 POUNDS! I feel nauseous just thinking about it. The thing was the size of a baby. No joke. Fish ate a baby.


I used OPI Alpine Snow Matte as a base, which chipped horribly within 2 hours. For the red bear, I used China Glaze Salsa, for the orange bear, Sally Hanson Hard As Nails Xtreme Wear in 06 Sun Kissed, for the yellow bear Urban Outfitters Yellow 1, for the green bear, OPI Green-wich Village, and for the clear bear, I used Maybelline Banana Puddin', which I can't find a link for, but I got mine from a lovely Aussie girl on Makeupalley.com. Everything was mixed with Sally Hansen All the White Stufffor the highlights. For the clear bear, I used Urban Outfitters Yellow 1 to distinguish the shapes on the bear (eyes, belly, etc). Topped everything off with 2 coats of Seche Vite top coat.

The maiden bite. He bit off his face because the bear was supposedly 'looking at him funny'.


After 3 lb. 3 oz was eaten.


And...because I found it amusing... the Spork, which isn't really a spork, but a Star Trek fork.


Eat Long and Prosper.

My teeth hurt.

Other Nail Designs

I thought I would share some other nail designs that I have done in the past with you. I have them on my blog, but in case you haven't gone back that far, here are some pictures (in no particular order) :) (Click on the picture to see how to do the design)


Smiley Face Nails


Watermelon Nails


Music Note Nails

Football Fanatic Nails

Rainbow Polkadot Nails

Tiger Stripe Nails


Zebra Print Nails

Leopard Print Nails

Gradient/Fading Nails

Thanks for reading!!!

Abby

Thursday, February 25, 2010

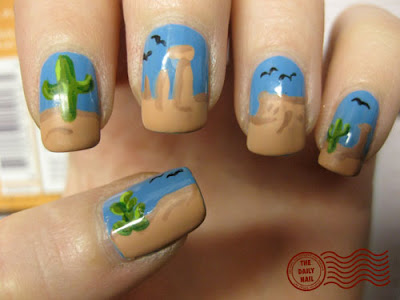
I Feel So Desert-ed.


Hey everyone!! Today's nails are an homage to the seemingly endless span of desert that surrounds the lovely city of sin, booze, hookers, and gluttony that I reside in. :-P No, those aren't bats, they're vultures- the Hunter S. Thompson/Fear and Loathing/Steadman nails are to come in the near future I think. :-D


I used Zoya Yummy as a base, with American Apparel Palm Springs for the desert, then mixed with Zoya Dea to shade. For the cacti, I used L.A. Girl Army Green, that I got at Urban Outfitters, Pure Ice Wild Thing to highlight, and Nubar Forest
for shadow. For the vultures, I used Zoya Raven. Topped everything off with Seche Vite top coat so it'd dry superfast, then topped off the sand portion with Essie Matte About You. :)

Note: No bodies are buried in the desert pictured, unlike the desert surrounding Vegas. ;)


Wednesday, February 24, 2010

Guest Post

My "cyber" friend (meaning I don't know her in person, only from her blog) asked me to do a guest post for her blog. She asked me to do a nail tutorial.... so I did. You can check out her modesty blog here, but to get to her main blog (where it is posted) you will have to give her your e-mail address so she can invite you (it is a private blog, due to security reasons). I did Snow White inspired nails, and I like how they turned out :) Since they are inspired, not Snow White herself, other people usually wouldn't know they were Snow White inspired... but I like them :) lol. She posted it on the 22 of February, but I just got around to posting this on my blog. Anyway, I thought you might wanna check it out. Oh and while your there, check out all her other great posts.

Thanks Camille!

Abby

I've Gotta Go No. 2.


hahha. Did the title worry you? :-P

I was laying on the couch last night trying to think of what to do on my nails, and totally not wanting to go out to my car to get my idea notebook. Suddenly it dawned on me, based on my nails yesterday, to do pencils!! :)


I used a mix of China Glaze Salsa and American Apparel Palm Springs for the eraser, China Glaze Millennium for the metal band, and then mixed with Zoya Raven for the shadow on the grooves on the band. For the pencil portion, I used Diamond Cosmetics #319 Lemon Yellow Zest for the pencil color, and then mixed with Electric Orange for shading on the sides of the pencil. Topped off the pencil and metal parts with Seche Vite top coat and the eraser with Essie Matte About You to give it that rubery look, but my lotion made it sorta shiny. damn. Oh well, now it looks like one of those old, hard erasers. :-P

LORAC sale on Hautelook!


Woot!! LORAC Sale on Hautelook- everything starts at $4, almost everything is $4 or $5, and the most expensive item is a palette for $16.50 Head on over. LOTS of e/s, l/s, cheek colors, and palettes. :)

Hautelook


Tuesday, February 23, 2010

Playing Fast & Loose(leaf)


Today's nails started out in my mind as just sheets of looseleaf paper, but I told my friend Erik (of Vegas Made Me Do It fame) of the idea, and he suggested that I add letter grades, so there you have it.


I used Sally Hansen All the White Stuff as a base, with a mix of Sally Hansen All the White Stuff and China Glaze Salsa for the pink lines, a mix of Sally Hansen All the White Stuff and Zoya Yummy for the blue lines, Zoya Raven for the holes, China Glaze Salsa for the grades, and Essie Matte About You to make it flat. Real pencil was used after the matte dried to draw on the squiggles to look like writing. :)

Did it make the grade?

Monday, February 22, 2010

Liquid Hot MAG-MAH.


Hey everybody!! :) I've been wanting to do this ever since I remembered the Cover Girl Crackle Polishes from long ago. Unfortunately, I cannot find a BLACK bottle of Cover Girl Crackle to save my life. However, I found this bottle of no-name crackle polish at a Halloween store, and finally decided to try it. Unfortunately, as it dried, it turned from Black to grey, but you can see where it stayed black in some spots.. :( Oh well, I still think it give close enough to the desired effect. I marbled red and orange underneath the crackle polish to give the feel of swirling lava.


I used Sally Hanson Hard As Nails Xtreme Wear in 06 Sun Kissed as a base, with China Glaze Salsa and Electric Orange marbled on top. I then brushed a coat of the aforementioned no-name black Halloween store crackle polish. Once it crackled, I topped it all off with 2 coats of Seche Vite top coat.

And for those that might remember the game, for those who love Daniel Tosh (of Tosh.0 and comedy fame), and for my friend Jordan....

THE FLOOR IS LAVA, THE FLOOR IS LAVA!

Sunday, February 21, 2010

You've Crossed the Lines


For those of you that are new readers, I am a part-time culinary student in addition to my full-time employment, as well as this lovely blog in the browser before you. Today's class was awesome, yet brutal. Therefore, I'm thoroughly exhausted, soooo, simple nails. (sorry) I am using two things in this mani that I haven't yet used, Zoya Harlow Matte, and the line pattern from Konad Plate m65.


I used Zoya Harlow Matte as a base, with China Glaze DV8 applied with Konad Plate m65 as well as freehanded on the tips. No Seche Vite today.. it must be a sin, right? (and on Sunday, no less)

k, I'm off to enjoy my goodies from class!! :)

Saturday, February 20, 2010

I Can See Clearly Now...


....the Rain is Gone. :-P

Welcome, all, to Day #3 of Hey, I'm Going To Get a Song Stuck in Your Head! Today's song of choice? 'I Can See Clearly Now' by Jimmy Cliff :-D You're welcome.

Sorry today's post is so late tonight. 10 p.m.! I was out of the house all day helping my friend Jessica with wedding stuff! :)


I used Orly Snowcone as a base, with Sally Hansen All the White Stuff sponged on to make clouds, which were shaded with Urban Outfitters Blue 2 sponged over the white. For the sun, I used Diamond Cosmetics #319 Lemon Yellow Zest and Electric Orange. Topped it all off with 2 coats of Seche Vite top coat.

Note: It's going to be a bright...bright, briiiight, bright sunshiny dayyyyy. :)


Friday, February 19, 2010

Rubber Ducky, You're the One...


You Make My Bath Time, So Much Fun!

Welcome to Day #2 of 'Try to Get That Song Out of Your Head'!! :-P Today's nails are inspired by a cake that my friend Brienne did with a rubber ducky and bubbles. it was sooooo cute. I'll try to find pictures! (or ask her for one) :-P


I used Orly Snowcone as a base, and mixed with Pure Ice French Kissfor the different tile colors. For the Dark blue outlines, I used Pure Ice French Kiss, for the water highlights and some of the tiles I used Orly Snowcone mixed with Sally Hansen All the White Stuff. For the grout, I used Sally Hansen All the White Stuff, and for ducky, I used Diamond Cosmetics #319 Lemon Yellow Zest for the body, and Electric Orange for the beak/bill and mixed with Diamond Cosmetics #319 Lemon Yellow Zest for the wing shading. For the eye, Sally Hansen All the White Stuff and Zoya Raven. There is also a little bit of Sapphire Sparkle Effect on the bubbles, but it is hard to see. I topped everything off with 2 coats of Seche Vite top coat.

Don't forget to wash yer butt. <---Words of Wisdom.

Thursday, February 18, 2010

Tye-Dye Inspired Nails

Hi guys!! I am hoping to get one more tutorial in tonight, but I'm not sure because it's already 10:17 pm and I'm sick :( That's why I may sound weird in the video... lol. So anyway, I thought this was kinda cool, so I wanted to show it :) I was just playing around with colors and this is what I came up with! You can use any colors for any occasion :) It showed up black on the front of the video... which I think I can change... but that is why I put the picture of the nails below. :) Also, my brother made the beginning intro from scratch, which I will be using now. He spent 5 hours making it and I like it a lot!! I also added the background music which I think I like so far! Let me know if you like both of those adjustments :D

Enjoy!

Hey guys, the video is encountering problems with the audio... I am trying to fix it. I am REALLY sorry for the inconvenience I'm not sure whats happening, but I am working on it. Thanks!


Feel free to leave a comment below! I will answer any questions you might have, and I love getting comments! If you have any requests, please let me know :)

Pink Polkadot (requested)

Hi guys!! I got a request... uumm... I hate to say it but it was exactly 2 weeks ago when I got it! And I am just now getting it all together and do it... I'm really sorry! Anyway, Camille kindly requested and she said...

That is such a great idea!! :) I have a request...I don't know if you'll be able to do it...lol. I got the idea from your button thing toward the bottom of your blog on the sidebar that says "Welcome Family and Friends". I was wondering if you'd be able to make a tutorial on a design with small light pink polka dots and a basecoat with a hot pink...kinda like the button on your blog. It would be cool if you could do it with white tips. :) That would be really pretty. I know that sounds really hard and weird....lol. If you can do it would you mind leaving a comment on my blog and telling me if you can?

Thanks so much Abby!!


-Camille

Thanks so much for requesting Camille! I am SO sorry it took me this long for me to get it... I was kinda slacking on my "job"! Okey-dokey, so here is the video!! My next video.... or the next one after that depending on how long it takes to save and stuff.... there will be a new intro... it will be pretty cool if you ask me! Hehe! My brother has been working on it non-stop... it has taken him at least 4 and a half hours! It is really cool though :) Also, in my next video I will have background music that has no singing in it... it is only instrumental. Camille told me that it was kind of hard to understand me with someone talking even though it was turned down - and I agree. :) SO after explaining to my dad and brother I asked them if we had any "only music" songs... and they said they didn't think so. But my dad had some music like that at his work and he gave it to me! Yay! Hehe... so I will put it on my next video because I forgot to put it in this one. lol. Enjoy the video!!!

Sorry that it shows up black... I'm not sure why it did that, but just hit play and it will start :)

Feel free to leave a comment below! I will answer any questions you might have, and I love getting comments! If you have any requests, please let me know :)

Walk Like an Egyptian


I am completely obsessed with Egypt. With ancient civilizations. With awesome. I have been a history nerd for longer than I can remember, I was the kid in the biography section of the library of the elementary school, the one checking out books on dead presidents and historical figures. I could watch History Channel all day long. Egypt, however, will always top my list of fascinating subjects, faraway lands, architecture, civilizations, etc. I just find it incredible to see things that were built or made thousands upon thousands of years ago that are #1. still intact and #2. made by hand without any of today's modern conveniences. I love going to Egypt exhibits in museums, and it baffles me that a cane, or a necklace, or a chair still exists, wholly intact, with the paint still vibrant and beautiful, which was made forever ago, but a pair of jeans I bought less than a year ago, or a dish that I have only had for a short time, etc. has long since broken or fallen apart. Our generation won't leave anything like that behind, it rather saddens me. But enough about nerdy history talk... on to the nails!! Today's nails were painted with actual Egyptian hieroglyphics!!


I used OPI Sand in My Suit as a base, Zoya Dea for the hieroglyphics and sponged VERY VERY lightly over 2 coats ofEssie Matte About You.

BTW, Good luck with getting that song out of your head...


Wednesday, February 17, 2010

Stereotyping Suburbia


These nails are inspired by and dedicated to the stereotypical suburban dream. I can just picture the Nuclear family (Parents, 2.2 kids, dog), waving from the other side. :-P Not sure what made me think of it. I think there was a white picket fence mentioned on tv while I was watching. Who knows. lol


I used Orly Snowcone as base, Sally Hansen All the White Stuff
for the picket fence, and both BB Couture Poison Ivy and Green Scene for the grass. :) Topped off with 2 coats of Seche Vite top coat.

Tuesday, February 16, 2010

Luxurious Rage


Hey everyone!!! Totally spaced on it being Mardi Gras today, having yesterday off threw off my schedule... I was convinced yesterday was a Sunday, so my apologies, no Mardi Gras nails... :-/ However, I was lucky enough to find a Sally Beauty that was selling the ORLY Foil FX collection, even though I'm thinking they weren't supposed to have them out, since it wasn't in their system, and I can't find anywhere selling it online yet. These colors are amazing. Like AMAZING. I wanted to do a design that would let the colors I chose shine.. literally. I bought all three, Rage, Luxe, and Shine, but only employed 2 in this design. When these polishes are for sale online, I will change the polish names to links like I usually have.

UPDATE: Head2toeBeauty is selling these polishes online, so click on the name of the polish below the pic to take you to the site where they are available for purchase- thanks Mood Puppet for the heads up! :)


I used Orly Rage as a base, which is a gorgeous Rose Gold foil, then sponged a little bit of Orly Luxe (the gold foil) on the tips, and then applied Zoya Raven with Konad Plate m70. Topped everything off with 2 coats of Seche Vite top coat.


Tip:
When stubborn glitter/shimmer wont leave your cuticles, use a nail cleaning brush to remove after polish is dry and you've cleaned up the cuticles with remover and a brush.

Laura Mercier Sale at Hautelook!


Hey all, another cosmetics sale at Hautelook- Laura Mercier!!

There are brush sets, candles, palettes, eyeshadows, mineral eyeshadows, lipsticks, tanner, etc..

Hautelook sale


Monday, February 15, 2010

Slow Down, Don't RUSH more!


Hey all!! Guess what today is? (Besides a day I got off of work?) PRESIDENT'S DAY! (Hence the day off work!!) In honor of the holiday, I decided to do my depiction of Mt. Rushmore on my nails.. :-P They're immortalized on money, in stone, and now in nail polish. ;)


I used Orly Mirror, Mirror as a base, and mixed with varying amounts of Zoya Raven for line work and shading. For the sky, I used Zoya Yummy. Topped everything off with 2 coats of Seche Vite top coat.

Happy President's Day! :)

Sunday, February 14, 2010

A Little Less Conversation, A Little More Action


Hey everyone- just thought I'd show the naughtier side of Valentine's Day today, since yesterday's nails were so sickeningly sweet (literally ;-P) Anyway, I know a favorite Valentine's Day pastime is doin' the naughty, and while I'm spending my day today in class, and watching episodes of Dexter from Season 1, I thought I'd do a tribute to everyone else's day. :-P


I used MAC Abalone Shell as a base, which is a great color to match my skintone, especially in natural light. For the corset color, I used China Glaze Salsa, and Zoya Raven applied with Konad Plate m57 for the fishnet overlay and black. For the cleavage on the thumb, I used Zoya Dea. and for the bra part, I used heart gems from a store called Chika Chika that was going out of business in the mall. :) Topped everything off with 2 coats of Seche Vite top coat.

Happy Valentine's Day, kids!

Saturday, February 13, 2010

Conversation With a Crunch


Hey all!! Happy Valentine's eve! In honor of tomorrow being Valentine's Day, I did conversation heart nails! :) I had them on the list, but they were also a request from reader 'Ms. Moment'. :)


I used OPI Gargantuan Green Grape matte for the thumb, China Glaze Lemon Fizz for the index, China Glaze Peachy Keen for the middle, essie Lilacism for the ring finger, and American Apparel Palm Coney Island for the pinky. For the lettering, I mixed American Apparel Palm Coney Island with China Glaze Salsa. Topped everything off with two coats of Essie Matte About You to get that chalky candy finish.

*No Conversation Hearts were wasted in the creation of this nail design, they were all eaten.

Friday, February 12, 2010

For Your Thoughts.

Hey everyone! Guess whose birthday it is today? I'll give a hint... he'd be 201 years old today. He sported a lovely beard. He was assassinated by John Wilkes Booth. ;) Ok, if you haven't figured it out yet, its Abe Lincoln!! :-P In honor of our 16th President's birthday, I decided to do penny nails, since he's on both sides!! :-P It didn't turn out as well as I'd hoped, because I quickly discovered it is very hard to paint the detail of a penny on a fingernail with a nail art brush. :-P it'd have to be like a single bristled art brush! lol


I used Milani Sassy Brassy, which to me looks more like copper, as a base, with a mixture of Zoya Raven, Zoya Angelina and Nubar Milk Chocolate Creme for the linework, and Zoya Raven for the black background, topped with Essie Matte About You. Penny art was topped off with 2 coats of Seche Vite top coat to really make 'em shine. ;)

Now, how about your 2¢?

Thursday, February 11, 2010

Cause & Effects

Hey everyone!! Today's nails were inspired by the kick-ass new colors that were sent to me to play with by CND (Creative Nail Design) They are amazing, and I'm not just saying that because they were gratis. They are super easy to apply, and are so close to being opaque, that I could've gotten away with one coat, but did two for good measure. Green Scene is well on it's way to becoming my favorite green, and Electric Orange is the orange creme I've been looking for! Lol, I'm such a nerd, but you can even ask my roommate how excited and impressed I was when I tried these. Today's manicure is utilizing all 3 colours and 2 effects that were sent, (Thank you!) I tried Konad stamping with the effects, but it didn't work very well :-/ but I included a closeup of the pinky, where you can see some of the orange/copper reflect from Copper Shimmer Effect polish, and some of the blue sparkles on the ring finger from Sapphire Sparkle Effect polish. Lesson learned I suppose.


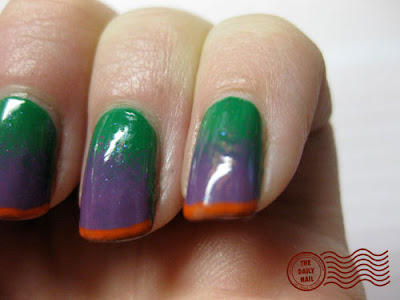
I used Green Scene as a base, with Eclectic Purple sponged on the tips. For the Electric Orange stripe, I painted a thick strip of polish on my palette, and dipped my tip into it. :) On top of everything, I used Copper Shimmer Effect and Sapphire Sparkle Effect on Konad Plate m65, using each polish on half of the design. Topped everything off with 2 coats of Seche Vite top coat.

Wednesday, February 10, 2010

Domino Nail Tutorial

Hi guys!! Sorry I haven't uploaded a video in a while! I had this one recorded for a long time.... and I even had it edited, but I did it on the wrong computer (it won't upload on blogger on the other one) so I had to re-edit it on this computer which took a while for me to do. OK, so here are the numbers I did on each finger :)

Right Hand
Pinky- double 5
Ring Finger - double 4
Middle Finger - double 3
Pointer Finger - double 2
Thumb - double 1

It's the exact opposite on the other hand...

Left Hand
Pinky - double 1
Ring Finger - double 2
Middle Finger - double 3
Pointer Finger - double 4
Thumb - double 5

Note: I didn't do a introduction as a narration or in person, because I don't want my videos to be so long. They take longer to upload on the computer, edit, save, upload on blogger, and most important; it takes more of your time to watch them. Most people don't have time to sit at the computer for 20 minutes just watching how to do your nails. So let me know how that is.... I think the intros were kinda boring too. But you watch them, and I would like to get any feedback on how I can improve my videos!! Also, I added background music... please let me know if you thought it should be turned down more or it was too much of a distraction, or you liked it or didn't like it, or whatever. :D

Enjoy!! Thanks for reading and watching!! It is REALLY appreciated!!!!!


Feel free to leave a comment below! I will answer any questions you might have, and I love getting comments! If you have any requests, please let me know :)

Domo-Arigato.

:-D lol For those of you not in the know, today's nails are Domo, or Domo-kun nails. Domo is the mascot of a Japanese television station, and has also been shown in a few short animations on Nickelodeon, in Target's Halloween decor, and most recently on the coffee cups, etc. at 7-11. He is described as 'a strange creature that hatched from an egg'. I just think he's cute. :-P I decided to paint him on my nails after seeing a Domo stuffed doll on my co-worker Kevin's desk. :)


I used Nubar Milk Chocolate Creme as a base, Sally Hansen All the White Stuff for the teeth and eye highlights, China Glaze Salsa for the mouth, and Zoya Raven for the eyes. Topped it off with 2 coats of Seche Vite top coat.

Fun fact: Domo is known to fart repeatedly when nervous or upset. :-P

*toot*


And a treat for my non-Twitter followers...

I found the surprise in the nail polish packaging!! (I think I'll stop buying nail polish from the Dollar Tree now)

Your eyes do not deceive you, that IS in fact a broken fingernail INSIDE the packaging. The irony? It was for a strengthening polish!!

I'm contemplating contacting the company and asking if anyone is missing their nail and would like it back. :-D


Tuesday, February 9, 2010

They're GRRRRReat!


So I get a lot of questions from readers, some from the comments, and some by email, but the MOST asked question is where do I get my inspiration? Today I'll give you a bit of a glimpse of where and how I arrive on a design. lol (It's a short one today, I promise) As I sat down to do my nails for today, I was at a loss for what to paint. I racked and racked my brain, yet nothing came, so I looked to the list for inspiration, and stopped upon the idea submitted to me by reader Ada C., Hot Air Balloons! :) This got wheels turning, and reminded me of air shows and hot air balloon shows that I went to in Battle Creek, MI when I was a kid with my parents. There were literally HUNDREDS of hot air balloons in every size and shape imaginable - one was even shaped like a slice of cake! :) Anyway, everyone in Michigan knows (as do those who are avid cereal eaters) that Battle Creek, MI is the home of Kellogg's! Then I thought to myself...'Self, What do you think of when you think of Kellogg's?' and then I answered myself...'Tony the Tiger!' and thus, Tony the Tiger nails were born.


I used Urban Outfitters Orange 2 as a base for all nails, with Zoya Raven applied with Konad Plate m57 for the Tiger print nails. For the Tony nail, I used Sally Hansen All the White Stuff for the white, Pure Ice French Kiss for the nose, and then mixed with white for the highlighting. For the highlighting on the nose, I mixed Urban Outfitters Orange 2 with Diamond Cosmetics #319 Lemon Yellow Zest, which I also used for the eyes. Diamond Cosmetics Giddy was used for shading on the white parts of the face, and Zoya Raven was used for all black line work. For the background color, I used Zoya Yummy. :) Topped it off with 2 coats of Seche Vite top coat, so they don't get soggy in milk.

Monday, February 8, 2010

Faster Than a Speeding Bullet!


Haha, the 'Super'bowl put me in a 'Super' mindset, so I decided to do Superman nails. I also find these nails amusing because for years and years and years, I went by the screenname 'SuperMel' on the interwebs... originally on theglobe.com, an online chatroom when I was all of 15. :-P Yes, I'm a dork, it's ok, I know I am.


I used Pure Ice French Kiss as a base, with Diamond Cosmetics #319 Lemon Yellow Zest for the yellow, and China Glaze Salsafor the red border and 'S'. Topped it off with 2 coats of Seche Vite top coat to protect the nails from Kryptonite. (It's dangerous stuff I hear)

Kevyn Aucoin on Hautelook!

Hey all!!! Just a quick note to tell you that Kevyn Aucoin beauty is on sale on Hautelook today, everything is $7 and under!!!

The link:

Hautelook

WOOO!! Lots of good stuff, lipsticks, glosses, eyeshadows, pencils, etc.

Sunday, February 7, 2010

Are You Ready For Some Footballlll?!

So apparently here in the US, there is this sporting event going on today... the Superbowl somethin' er other. :-P I felt like I HAD to do Superbowl nails to commemorate the event, so I give you the Saints vs. the Colts... who will win in THIS epic battle? (I mean the one on my nails, not the one on TV) :-P Bread class kicked my ass today, and I promptly passed out on the couch in full chef regalia as soon as I got home. :-P (which is why the post is on the later side)


I used China Glaze 2030 from Khrome Collection as a base for the Saints nails, Zoya Raven for the fleur de lis outlined in Sally Hansen All the White Stuff. For the Colts nails, I used Sally Hansen All the White Stuff as a base, with Pure Ice French Kiss for the horseshoe and Sally Hansen All the White Stuff again for the white dots. Topped off both teams with 2 coats of Seche Vite top coat.

Ok, enjoy the Superbowl, I'm off to get some wings to mess up my pretty nails. *drool* They're all I can think about today.

Saturday, February 6, 2010

I May Have Lost My Marble..s...

Hey all!! Quick nail today- lots to do today! Concert tonight, plus I had my makeup done by the lovely MA, Britta, from Pennsylvania, who was at the local MAC store for the unveiling of the latest and greatest MAC collection. (picture to follow at the end of the post)


I used American Apparel Cotton as a base, with American Apparel Peacock and China Glaze 2030 from Khrome Collection marbled, the 2030 didn't like to play well with Peacock, and instead of marbling, just got blotchy... oh well. Topped off with 2 coats of Seche Vite top coat.


The makeup:


closeup of the eye makeup:


and one crazzzzzzzzzzy nail blogger photo:

Friday, February 5, 2010

Thank God It's FRYday.


Ok, so I had to do this to prove just how much of a dork I really am.... as if it weren't evident enough. :-P

So Happy FRYday, all. :) (get it? Fries because it's FRIDAY?!) I kill me. :-P

The thumb came out best I think.


One where the M's are right-side up and the fries aren't all fallin' out! :-P


I used American Apparel Manila mixed with Nubar Milk Chocolate Cremefor the fries in the very back, American Apparel Manila alone for the fries in the middle ground and for the McDonald's logo, and then American Apparel Manila mixed with American Apparel Cotton for the fries in the foreground. :) for the McD's carton, I used China Glaze Salsa, with Zoya Dakota to shade. :)

TGIF! :)

Thursday, February 4, 2010

Blue Flower Nails (requested!)

Hi guys! I got requested to do a flower nails, and I came up with this. They are SOOOO simple and easy, and really cute! Hope you enjoy!!

Also, sorry you cannot see what I was typing across the screen in the beginning... I see mine on a much bigger screen when I'm editing it, so I just have to guess at the right size... all I said was that the little piece of hair that was sticking out was bothering me (lol) and that I didn't mean "more funner" I meant "more fun"... I think that's it... :D

Isn't it weird how the narration and me talking on camera changes my voice so much? I don't know which one sounds more like my normal voice, but it's kinda funny how it changes.


Feel free to leave a comment below! I will answer any questions you might have, and I love getting comments! If you have any requests, please let me know :)

Who Can Take the Sunrise...Sprinkle it With Dew...


...Cover it with chocolate and a miracle or two.. the candy man can!! :) Ok, these nails are a tribute to one of the greatest movies of all time... Willy Wonka and the Chocolate Factory!!! I LOVE LOVE LOVE this movie, and Gene Wilder's Lovable, yet unsettlingly close to insane character. :-P I chose to paint Willy Wonka's purple velvet jacket, purple flowered shirt, and gold satin bow tie! I even used a Zoya Matte Velvet collection color for the VELVET jacket!!! :-P


I used Zoya Savita matte for the jacket, mixed with Sally Hansen All the White Stuff for the lapels, and again for the purple on the shirt. For the white of the shirt, I used OPI Alpine Snow Matte, and for the bow tie I used China Glaze 2030 from Khrome Collection, then mixed with China Glaze Liquid Leather to shade, and tehn topped it off with Essie Matte About You to dull down the shine of the Khrome.

Remember:

"Invention, my dear friends, is 93% perspiration, 6% electricity, 4% evaporation, and 2% butterscotch ripple. "

Oh, and the snozzberries DO taste like snozzberries.

Wednesday, February 3, 2010

Up, Up & Away!


So, I LOVE the Up & Away Collection from China Glaze, and bought 10 of the 12 colors (the other two looked too similar to something I already had). I really wanted to use them all, as I normally do when I'm excited about a polish haul, so I got the genius (self-proclaimed) idea to replicate the China Glaze Up & Away collection art, and paint my nails to look like the balloons! :) Sorry, but I just couldn't get good pictures of these nails, I tried and tried!! :(

The reference:


I used

Left Thumb:

China Glaze Flyin' High as a base, with American Apparel Peacock to shade, and China Glaze Re-Fresh Mint to highlight. For the China Glaze logo, I also used American Apparel Peacock.

Left Index:

China Glaze Peachy Keen as a base, with Zoya Paz to shade, and China Glaze White on White to highlight. Zoya Paz was also used for the China Glaze logo.

Left Middle:

China Glaze Grape Pop as a base with China Glaze Liquid Leather to shade, China Glaze Light As Air to highlight, and OPI Russian Navy matte for the China Glaze logo.

Left Ring:

China Glaze Lemon Fizz as a base, with China Glaze Happy Go Lucky to shade, and China Glaze White on White to highlight. A mix of Zoya Paz and China Glaze Happy Go Lucky were used for the China Glaze logo.

Left Pinky:

China Glaze Something Sweet as a base, and mixed with China Glaze Heli-Yum to shade. To highlight, I used China Glaze White on White, and China Glaze Something Sweet mixed with China Glaze Heli-Yum for the China Glaze logo.


Right Thumb:

China Glaze Happy Go Lucky as a base, with a mix of Zoya Paz and China Glaze Four Leaf Clover to shade (I hate the shading on this one), and China Glaze Lemon Fizz to highlight. For the China Glaze logo, I used Zoya Paz.

Right Index:

China Glaze Four Leaf Clover as a base, (Love this color!), American Apparel Peacock to shade, China Glaze Re-Fresh Mint to highlight, and American Apparel Peacock again for the China Glaze logo.

Right Middle:

China Glaze Light As Air as a base, with China Glaze Grape Pop to shade, China Glaze White on White to highlight, and China Glaze Light As Air mixed with China Glaze Grape Pop for the China Glaze logo.

Right Ring:

China Glaze Heli-Yum as a base (unexpectedly LOVE this color!!), with Zoya Dakota to shade, China Glaze Something Sweet to highlight, and Zoya Dakota again for the China Glaze logo.

Right Pinky:

China Glaze Re-Fresh Mint as a base with China Glaze Four Leaf Clover to shade, China Glaze White on White to highlight, and China Glaze Four Leaf Clover again for the China Glaze logo.

Topped everything off with 2 coats of Seche Vite top coat to smooth out the dullness that sponging creates.

Did this collection take you Up & Away?
My Zimbio My Ping in TotalPing.com